Difference between revisions of "Printer Authentication"
(Redirected page to Https://support.cs.ksu.edu/CISAdminDocs/wiki/Printer Authentication) |
|||
| Line 1: | Line 1: | ||
| + | ==Requirements== | ||
| − | + | To be able to use E2184B-KM Copier/Printer you first need to be granted access from Earl Harris in a form of a PIN. Only Faculty and select Graduate Students can be granted access to E2184B-KM Copier/Printer, please check with your supervisor about the access. | |
| + | |||
| + | If you have been issued a PIN, than you will need to enable and configure the Account Track Authentication on your Windows machine. | ||
| + | |||
| + | First install a new printer on your system, please refer to [https://support.cs.ksu.edu/CISDocs/wiki/Printing this guide] for installation instructions under Printing from Personal of Office Computer. | ||
| + | |||
| + | ==Enabling and Configuring Account Track Authentication== | ||
| + | |||
| + | If new printer installation was successful, you will be able to to find the printer by going to Settings > Devices > Printers & Scanners as pictured below. | ||
| + | |||
| + | [[File:Setp1.jpg|center|border|900px|Image: 450 pixels]] | ||
| + | |||
| + | |||
| + | |||
| + | * Select the printer and click on Manage button. This will also allow you check the queue and print a test page. | ||
| + | |||
| + | [[File:Manage.jpg|center|border|337px|Image: 90 pixels]] | ||
| + | |||
| + | * Select Printer Properties from the menu that appears. | ||
| + | * Click the Configure tab. It is the second tab from right most tab at the top. | ||
| + | * In the Device Option box select Account Track. | ||
| + | * Change the Setting field to Enable then click Apply. | ||
| + | |||
| + | [[File:AccountTrackEnable.jpg|center|border|340px|Image: 140 pixels]] | ||
| + | |||
| + | * Click the Settings tab, right next to Configure tab, then the Authentication Settings button. | ||
| + | * Check the Popup Authentication Dialog when printing field then click OK twice. | ||
| + | |||
| + | [[File:AuthenticationDialog.jpg|center|border|487px|Image: 262 pixels]] | ||
| + | |||
| + | * Select Printing Preferences from the menu that appears. | ||
| + | * Click the Basic tab. It is the second tab from left most tab at the top. Then click the Authentication/Account Track button. | ||
| + | * Leave the Department Name field blank. In the Password field, enter the PIN that was provided for you. | ||
| + | * Click OK twice then close the Devices and Printers window. | ||
| + | |||
| + | [[File:AccountTrackButton.jpg|center|border|520px|Image: 382 pixels]] | ||
| + | |||
| + | ==Summary== | ||
| + | |||
| + | After enabling and configuring Account Track Authentication you will be able to use E2184B-KM Copier/Printer. Your user name will appear next to the job you have submitted in the job list on the printer screen itself. You do not need to log into the printer, your print job will be completed right away. | ||
Revision as of 16:51, 29 August 2018
Requirements
To be able to use E2184B-KM Copier/Printer you first need to be granted access from Earl Harris in a form of a PIN. Only Faculty and select Graduate Students can be granted access to E2184B-KM Copier/Printer, please check with your supervisor about the access.
If you have been issued a PIN, than you will need to enable and configure the Account Track Authentication on your Windows machine.
First install a new printer on your system, please refer to this guide for installation instructions under Printing from Personal of Office Computer.
Enabling and Configuring Account Track Authentication
If new printer installation was successful, you will be able to to find the printer by going to Settings > Devices > Printers & Scanners as pictured below.
- Select the printer and click on Manage button. This will also allow you check the queue and print a test page.
- Select Printer Properties from the menu that appears.
- Click the Configure tab. It is the second tab from right most tab at the top.
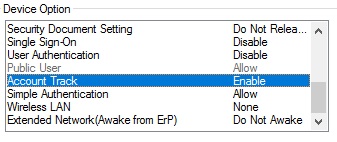
- In the Device Option box select Account Track.
- Change the Setting field to Enable then click Apply.
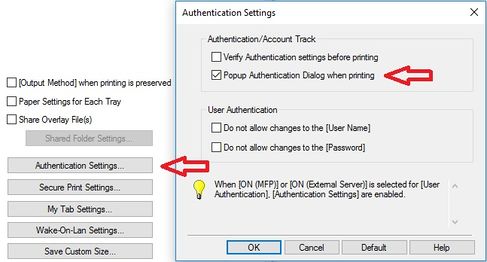
- Click the Settings tab, right next to Configure tab, then the Authentication Settings button.
- Check the Popup Authentication Dialog when printing field then click OK twice.
- Select Printing Preferences from the menu that appears.
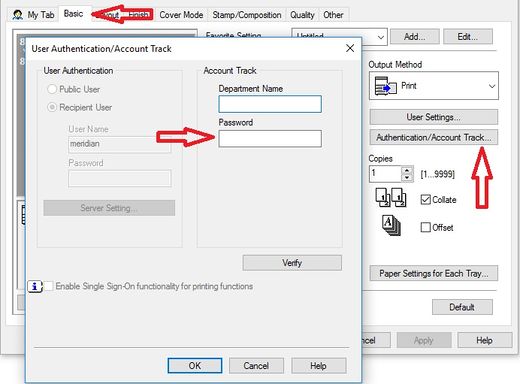
- Click the Basic tab. It is the second tab from left most tab at the top. Then click the Authentication/Account Track button.
- Leave the Department Name field blank. In the Password field, enter the PIN that was provided for you.
- Click OK twice then close the Devices and Printers window.
Summary
After enabling and configuring Account Track Authentication you will be able to use E2184B-KM Copier/Printer. Your user name will appear next to the job you have submitted in the job list on the printer screen itself. You do not need to log into the printer, your print job will be completed right away.


