Difference between revisions of "Windows Questions"
(Created page with "<div id="MSDNAA"></div> == I need some software by Microsoft for a project, can you give it to me? == Possibly. Our licensing with Microsoft allows us to give students softwar...") |
(→Instillation) |
||
| (29 intermediate revisions by 5 users not shown) | |||
| Line 1: | Line 1: | ||
<div id="MSDNAA"></div> | <div id="MSDNAA"></div> | ||
== I need some software by Microsoft for a project, can you give it to me? == | == I need some software by Microsoft for a project, can you give it to me? == | ||
| − | Possibly. | + | <!--Possibly. {{#lsth:Dreamspark Programs | Microsoft Imagine}}--> |
| − | + | Possibly. All CS students have access to a variety of Microsoft software through the Azure Portal. | |
| − | + | === Logging in to the Azure Portal === | |
| − | + | * First, you need to go [https://azureforeducation.microsoft.com/devtools Microsoft Azure Dev Tools for Teaching] and simply click on [[File:signin.png]]. | |
| − | + | * Next, you will be prompted to sign in to your Microsoft account. You must use your K-State email address to sign in properly. | |
| + | |||
| + | [[File:microsoft_signin.png]] | ||
| − | + | * If you get a screen like the one below, be sure to click on the top option labeled "Work or school account created by your IT department" | |
| − | + | [[file:ms_login_2.png]] | |
| + | |||
| + | * You should now be redirected to the K-State sign in page. Simply log in normally using your eID and K-State password. | ||
| + | |||
| + | * If you have signed in properly you will be greeted by a page looking like the one below. | ||
| + | |||
| + | [[File:azure-090619.png|800px]] | ||
| + | |||
| + | |||
| + | === Downloading and Registering Software === | ||
| + | |||
| + | * To use the software you need to first download it. Visual Studio is used in this example, but the same applies to all software that requires local installation. Click on the software icon and you will be presented with the following window. | ||
| + | |||
| + | [[File:software.png]] | ||
| + | |||
| + | * To download Visual Studio, simply click on [[File:download.png]] and follow the instructions. Once you have downloaded and installed Visual Studio, you need to register it. You should always register all the software you are planning on using for a prolonged period of time, such as for a full semester. | ||
| + | |||
| + | *To register Visual Studio, simply click on [[File:view_key.png]] and copy the license key provided. You will need to use that license key to register Visual Studio on your account. | ||
| + | |||
| + | === License Agreement === | ||
| + | |||
| + | Remember, this is for your own personal use as a CS student. You are not legally permitted to download software for your friends or families. Doing so will break the terms of the Microsoft academic agreement. Distributing illegal copies of software is against state and federal laws and the policies of this university. | ||
== How do I take a screenshot in Windows? == | == How do I take a screenshot in Windows? == | ||
| Line 48: | Line 71: | ||
When you launch File``Zilla, the window looks like this: | When you launch File``Zilla, the window looks like this: | ||
| − | + | [[File:filezilla_main.png]] | |
First-time users will need to create a new connection which you can re-use later. | First-time users will need to create a new connection which you can re-use later. | ||
# Click on the the Site Manager button here: | # Click on the the Site Manager button here: | ||
| − | + | #: [[File:filezilla_sitemgr_button.png]] | |
# This opens up a new window. Click on the "New Site" button. | # This opens up a new window. Click on the "New Site" button. | ||
| − | + | #: [[File:filezilla_sitemgr1.png]] | |
# Set the name of your new site to something easy to remember, like the name of the server you are connecting to. | # Set the name of your new site to something easy to remember, like the name of the server you are connecting to. | ||
| − | + | #: [[File:filezilla_new_site.png]] | |
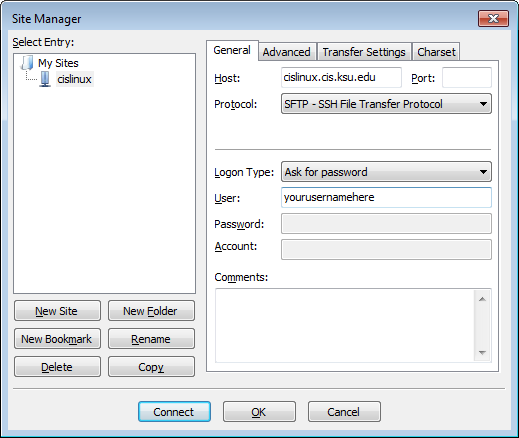
# Make the following changes to the site settings: | # Make the following changes to the site settings: | ||
#* '''Protocol''': SFTP - SSH File Transfer Protocol | #* '''Protocol''': SFTP - SSH File Transfer Protocol | ||
#* '''Login Type''': Ask for password | #* '''Login Type''': Ask for password | ||
#* '''User''': enter your username here, not your full email address | #* '''User''': enter your username here, not your full email address | ||
| − | And click OK when done. | + | #: And click OK when done. |
| − | + | #: [[File:filezilla_sitemgr2.png]] | |
# You should now be returned to the main window. Click on the dropdown next to the Site Manager button and select your newly saved site. | # You should now be returned to the main window. Click on the dropdown next to the Site Manager button and select your newly saved site. | ||
| − | + | #: [[File:filezilla_host_selection.png]] | |
# You will be prompted for your password. Enter it here. '''''NOTE: This is your CIS password, not your KSU eID password.''''' | # You will be prompted for your password. Enter it here. '''''NOTE: This is your CIS password, not your KSU eID password.''''' | ||
| − | + | #: [[File:filezilla_passwd_dialog.png]] | |
| − | |||
# Once connected, the main window should look like this. Transfer files by selecting the source on the left and destination on the right. | # Once connected, the main window should look like this. Transfer files by selecting the source on the left and destination on the right. | ||
| − | + | #: [[File:filezilla_connected.png]] | |
# When you are finished, click on the Disconnect button. | # When you are finished, click on the Disconnect button. | ||
| − | + | #: [[File:filezilla_disconnect.png]] | |
== How do I burn an .ISO image to a Disc? == | == How do I burn an .ISO image to a Disc? == | ||
| Line 78: | Line 100: | ||
To burn an .iso to CD/DVD, place a blank disc in the CD/DVD ROM tray and run DeepBurner. When the program starts, it will prompt you to select the project type. Select "Burn ISO image." Click the "..." button beside the Image file text box to specify the location of your saved .iso file. Click the "Burn ISO" button to begin burning the disc. | To burn an .iso to CD/DVD, place a blank disc in the CD/DVD ROM tray and run DeepBurner. When the program starts, it will prompt you to select the project type. Select "Burn ISO image." Click the "..." button beside the Image file text box to specify the location of your saved .iso file. Click the "Burn ISO" button to begin burning the disc. | ||
| + | |||
| + | == Cygwin == | ||
| + | === Introduction === | ||
| + | If you are using windows it is likely at some point you have need some GNU tools at some point. Cygwin is a collection of common gnu utilities compiled to run on windows. | ||
| + | |||
| + | === Instillation === | ||
| + | First download the installer from cygwin's website https://cygwin.com/install.html select setup-x86_64.exe and download the installer. On the first screen select "install from the internet". Then you can leave the defaults for the rest of the windows until you are asked which server you would like to install from. Select the first server listed which should be http://cygwin.mirror.constant.com. Next you will be prompted with this screen showing all the possible packages you can install. | ||
| + | |||
| + | |||
| + | [[File:Cygwin.PNG|package installation]] | ||
| + | |||
| + | |||
| + | You can select which package you want by double clicking the word skip or clicking the drop down menu and selecting the most recent version. When you are done selecting packages click next then finish. Cygwin will download and install your packages this may take a while. | ||
| + | |||
| + | === Clion === | ||
| + | In addition to installing the CLion IDE you will need to install a C compiler, the build tool make, and a C debugger. These do not come bundled with CLion because CLion likes to give you the option of where you get these from. We support using Cygwin to install these packages. Follow the steps as listed above and make sure to install the following. | ||
| + | * gcc-g++ | ||
| + | * clang | ||
| + | * make | ||
| + | * gdb | ||
| + | There will be a lot of packages with names similar to these but be sure to install these. | ||
| + | Then open Clion and click file then settings and search for toolchain. Click the + button and select Cygwin from the drop down. Clion should automatically find the proper .exe files for you. If it can not you will need to choose the following. | ||
| + | |||
| + | * Make <code> c:\cygwin\bin\make.exe </code> | ||
| + | * C Compiler <code> c:\cygwin\bin\gcc.exe </code> | ||
| + | * C++ Compiler <code> c:\cygwin\bin\c++.exe </code> | ||
| + | * Debugger <code> c:\cygwin\bin\gdb.exe </code> | ||
| + | |||
| + | Then with Cygwin selected in the sidebar press the up arrow next to the plus sign until Cygwin is at the top, it should now say "(default)" next to it. Now close out and reopen Clion and you Cygwin should be your default toolchain. | ||
Revision as of 16:32, 31 January 2020
Contents
I need some software by Microsoft for a project, can you give it to me?
Possibly. All CS students have access to a variety of Microsoft software through the Azure Portal.
Logging in to the Azure Portal
- First, you need to go Microsoft Azure Dev Tools for Teaching and simply click on
 .
.
- Next, you will be prompted to sign in to your Microsoft account. You must use your K-State email address to sign in properly.

- If you get a screen like the one below, be sure to click on the top option labeled "Work or school account created by your IT department"

- You should now be redirected to the K-State sign in page. Simply log in normally using your eID and K-State password.
- If you have signed in properly you will be greeted by a page looking like the one below.

Downloading and Registering Software
- To use the software you need to first download it. Visual Studio is used in this example, but the same applies to all software that requires local installation. Click on the software icon and you will be presented with the following window.

- To download Visual Studio, simply click on
 and follow the instructions. Once you have downloaded and installed Visual Studio, you need to register it. You should always register all the software you are planning on using for a prolonged period of time, such as for a full semester.
- To register Visual Studio, simply click on
 and copy the license key provided. You will need to use that license key to register Visual Studio on your account.
License Agreement
Remember, this is for your own personal use as a CS student. You are not legally permitted to download software for your friends or families. Doing so will break the terms of the Microsoft academic agreement. Distributing illegal copies of software is against state and federal laws and the policies of this university.
How do I take a screenshot in Windows?
To take a screenshot (image of the screen) in Windows, follow the following steps:
- Press "Print Scrn" on the keyboard (next to "Scroll Lock" at the top).
- Open Microsoft Paint (Start Menu > All Programs > Accessories > Paint).
- Go to Edit > Paste to paste the image.
- Save the image as a BMP in your home directory by going to File > Save As...
- Do with the image as you please.
How do I enable X forwarding in Windows?
The following explains the process of enabling X forwarding through SSH to view X applications in Windows.
- Start XServer by going to Start > XServer
- Open PuTTY by going to Start > PuTTY
- In the Category menu for PuTTY, select Tunnels
- Check the box next to "Enable X11 Forwarding"
- In the Category menu for PuTTY, select Session
- Under Host Name, type "cislinux.cis.ksu.edu"
- Choose SSH as your Protocol
- Now click "Open"
- Enter your username and password when prompted
- Enjoy
You can test to see if X forwarding is working by typing "xeyes", which should bring up an application with two eyes following your mouse pointer.
How do I transfer files to or from the CIS systems?
NOTE: Due to authentication problems and account lockouts caused by WinSCP, we no longer recommend using this application for file transfer. We suggest the following instead.
File``Zilla is a good cross-platform desktop file transfer application that is both free to use and open source. You can download the client from http://filezilla-project.org/ and install it on your own system.
When you launch File``Zilla, the window looks like this:

First-time users will need to create a new connection which you can re-use later.
- Click on the the Site Manager button here:
- This opens up a new window. Click on the "New Site" button.
- Set the name of your new site to something easy to remember, like the name of the server you are connecting to.
- Make the following changes to the site settings:
- Protocol: SFTP - SSH File Transfer Protocol
- Login Type: Ask for password
- User: enter your username here, not your full email address
- And click OK when done.
- You should now be returned to the main window. Click on the dropdown next to the Site Manager button and select your newly saved site.
- You will be prompted for your password. Enter it here. NOTE: This is your CIS password, not your KSU eID password.
- Once connected, the main window should look like this. Transfer files by selecting the source on the left and destination on the right.
- When you are finished, click on the Disconnect button.


How do I burn an .ISO image to a Disc?
N022 and N126 labs have DeepBurner installed on the Windows machines along with CD/DVD burners. This is free software and is available to download for your own personal use at http://www.deepburner.com/.
To burn an .iso to CD/DVD, place a blank disc in the CD/DVD ROM tray and run DeepBurner. When the program starts, it will prompt you to select the project type. Select "Burn ISO image." Click the "..." button beside the Image file text box to specify the location of your saved .iso file. Click the "Burn ISO" button to begin burning the disc.
Cygwin
Introduction
If you are using windows it is likely at some point you have need some GNU tools at some point. Cygwin is a collection of common gnu utilities compiled to run on windows.
Instillation
First download the installer from cygwin's website https://cygwin.com/install.html select setup-x86_64.exe and download the installer. On the first screen select "install from the internet". Then you can leave the defaults for the rest of the windows until you are asked which server you would like to install from. Select the first server listed which should be http://cygwin.mirror.constant.com. Next you will be prompted with this screen showing all the possible packages you can install.

You can select which package you want by double clicking the word skip or clicking the drop down menu and selecting the most recent version. When you are done selecting packages click next then finish. Cygwin will download and install your packages this may take a while.
Clion
In addition to installing the CLion IDE you will need to install a C compiler, the build tool make, and a C debugger. These do not come bundled with CLion because CLion likes to give you the option of where you get these from. We support using Cygwin to install these packages. Follow the steps as listed above and make sure to install the following.
- gcc-g++
- clang
- make
- gdb
There will be a lot of packages with names similar to these but be sure to install these. Then open Clion and click file then settings and search for toolchain. Click the + button and select Cygwin from the drop down. Clion should automatically find the proper .exe files for you. If it can not you will need to choose the following.
- Make
c:\cygwin\bin\make.exe - C Compiler
c:\cygwin\bin\gcc.exe - C++ Compiler
c:\cygwin\bin\c++.exe - Debugger
c:\cygwin\bin\gdb.exe
Then with Cygwin selected in the sidebar press the up arrow next to the plus sign until Cygwin is at the top, it should now say "(default)" next to it. Now close out and reopen Clion and you Cygwin should be your default toolchain.